
At a glance
- The whole job lives or dies on two things: a sound, dry substrate (pull-off ≥ 1.5 MPa, moisture < 4%) and full wet-out — roll every air pocket out of the fabric before the resin gels.
- Six steps:
- Plan the resin for the whole bay before you start — resin that gels mid-job cannot be rescued by a later top-coat; that section must be cut out.
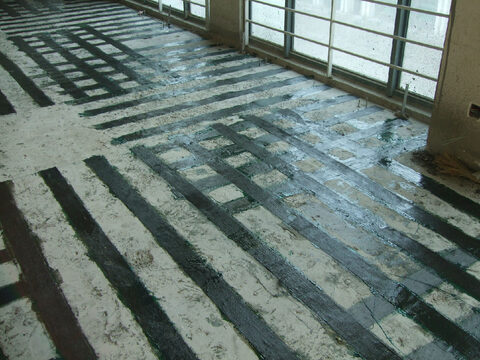
Installing carbon fiber fabric is a wet lay-up: you bond a dry carbon fiber fabric (FSC200–600) to prepared concrete with a structural epoxy, on site, ply by ply. The same procedure is what contractors call a “carbon fiber wrap” or externally bonded CFRP. Done right it develops the fabric’s full capacity; done wrong it debonds before the fiber does any work. This is the FidStrong method, with every figure traced to the product data sheets and to ACI SPEC-440.12-22, the mandatory-language construction specification that project specs incorporate by reference. For what the system achieves, start with what CFRP strengthening is.
1. Prepare the concrete surface: grind, pull-off test ≥ 1.5 MPa, moisture < 4%
Everything starts with the substrate. Grind or abrasive-blast away all unsound concrete, laitance, paint, and contaminants until the aggregate is exposed and the profile is open. Then verify two numbers before any resin goes on: pull-off tensile strength must reach at least 1.5 MPa per the FidStrong data sheet (ACI 440.2R’s floor for the substrate is 1.4 MPa / 200 psi by ASTM C1583), and moisture content must be below 4% (ASTM D4263). Round outside corners the fabric will wrap to a radius of at least 20 mm per the FSC data sheet (ACI SPEC-440.12-22 §3.1.7 sets the floor at 1/2 in. / 13 mm) so the fiber is not kinked, and work only within a substrate and ambient temperature of +5 to +35 °C. Deep-dive: surface preparation for CFRP.
2. Prime the concrete with epoxy primer (FSE302)
Prime to seal the pores and stop outgassing that would otherwise blister the laminate. Mix FSE302 primer at 2:1 by weight (about 40 minutes of pot life at 23 °C) and apply a single coat at 0.3–0.5 kg/m², worked into the surface with no puddling. It is tack-free in roughly 2 hours. Critically, the saturating resin must go on within the primer’s 2–24 hour recoat window — never after it has fully cured, or bond suffers.
3. Level irregularities with epoxy putty
Only where needed. Fill out-of-plane deviations larger than 0.8 mm (1/32 in., ACI SPEC-440.12-22 §3.1.4); the FidStrong Method Statement and FSC data sheet use a stricter 0.5 mm. Use FSE502 leveling putty (2:1 mix, touch-dry ~1.5 h, full cure ≥ 24 h) before priming, and build deep repairs over 5 mm up in layers. The goal is a plane surface so the fabric beds down in full contact — bridging a gap leaves an unbonded void.
4. Apply the bonding epoxy and lay the carbon fiber fabric
Apply the first pass of saturating resin to the primed surface — FSE322 (2:1 by weight; pot life 70 min for a 500 g mass at 23 °C, TDS-FSE322) for general work, or FSE323H for overhead and heavy fabric that must not sag. Pot life shrinks with a bigger batch and a hotter day, so mix only what you can lay within that window. Press the fabric into the wet resin along the design direction, holding orientation to within ±5° (ACI SPEC-440.12-22 §3.5.4.1). Then apply the second pass through the fabric and roll from the centre outward with a ribbed roller to drive out every air bubble before the resin gels. Consumption per the FSE322 data sheet (CONSUMPTION table): FSE302 primer 0.3–0.4 kg/m² (the FSE302 sheet itself allows up to 0.5 on porous concrete); saturating resin per ply, both passes together, 0.5–0.7 kg/m² for 200 g/m² fabric, 0.6–0.9 for 300 g/m², 1.0–1.2 for 600 g/m². This wet-out is the make-or-break quality point.
5. Add further plies wet-on-wet (lap ≥ 100 mm)
For multi-ply laminates, lay each additional ply while the previous layer is still tacky. If a layer is allowed to fully cure first, it must be mechanically abraded and solvent-wiped before the next ply can bond — ACI SPEC-440.12-22 §3.3.5 bars laying onto a cured layer that has not been re-prepared. Overlap splices in the fiber direction by at least 100 mm (a data-sheet floor; the design lap length is set by testing per ACI 440.2R).
6. Cure 7 days, inspect, and protect from UV
Let the laminate reach full cure — 7 days at 23 °C, protected from disturbance, rain, and sunlight (see curing guidelines). Then inspect: sound the surface by tap or coin test, or use infrared thermography, to find dry or delaminated spots, and on bond-critical jobs pull-off test to ASTM D7522 — a pass needs both > 200 psi (1.4 MPa) and failure inside the concrete (ACI SPEC-440.12-22 §3.5.2.5). Finally, outdoors, protect against UV by broadcasting 0.5–1.0 mm of quartz sand into the last wet coat plus a compatible topcoat; cured epoxy left UV-exposed degrades.
Which epoxy bonds carbon fiber fabric to concrete?
Two epoxies in sequence: FSE302 primer to seal the concrete, then FSE322 saturating resin to wet out the fabric and bond it. FSE302 is a low-viscosity primer (mixed viscosity ≤ 600 mPa·s, TDS-FSE302) that soaks into the open pores and stops the outgassing that blisters a laminate. FSE322 is a solvent-free, thixotropic saturating resin mixed 2:1 by weight (cured tensile strength 55 MPa and modulus 3.1 GPa by ASTM D638; bond to concrete 2.5 MPa with failure in the concrete by ASTM C882, TDS-FSE322), formulated to penetrate the weave and lock every filament to the substrate. A paste adhesive made for bonding plates (FSE362) or a general-purpose structural epoxy is not a substitute: the FSC fabric data sheet pairs the fabric with the FSE302 primer and the FSE322/323 saturating resins. Whatever resin is used, the service temperature must stay below its glass-transition temperature — see what Tg a structural epoxy needs for CFRP.
FAQ
Do I need a primer, or can I apply resin straight to the concrete?
In the FidStrong system, yes as standard: FSE302 penetrates the open pores and stops the outgassing that blisters a laminate (TDS-FSE302). The Method Statement lets the engineer omit the primer where specified; in that case FSE322 goes straight onto the prepared surface. If you do prime, the saturating resin must follow once the primer is touch-dry (about 2 h at 23 °C) and within its 2–24 h recoat window, never onto fully cured primer.
How long does a wet-lay-up CFRP wrap take to fully cure?
FidStrong’s FSE322/FSE323 saturating resins reach full cure in 7 days at 23 °C. The laminate must stay undisturbed, dry, and shielded from sunlight for that period; lower temperatures extend the cure, so cold-weather installs need a longer protected window.
How is a finished installation checked for quality?
Two checks: sounding (tap/coin test or infrared) to find dry or delaminated spots, and pull-off testing to ASTM D7522 — at least 3 tests per 1,000 ft² and 3 per day (ACI SPEC-440.12-22 §3.5.2.2), passing only if strength exceeds 200 psi (1.4 MPa) and failure occurs inside the concrete, not at the bond line (§3.5.2.5).
What happens if a small bubble or delaminated spot is found after cure?
Size decides the fix. Under about 2 in² (13 cm²) is often left if total voids stay below 5% of the laminate; 2–25 in² gets low-pressure epoxy injection; anything 25 in² (160 cm²) or larger is reported to the engineer and cut out and patched under an approved repair (ACI SPEC-440.12-22 §3.5.3.1–.3).
Why must resin that ran out mid-job be scrapped instead of topped up later?
Once resin under the fabric gels, a fresh coat hours later only films the surface — it cannot re-penetrate fibers already locked dry, leaving a weak cold joint. The fix is cutting out and re-laying that section, which is why you plan resin for the whole area first. See common installation mistakes.
Is a carbon fiber wrap the same as installing carbon fiber fabric?
Yes — it is the same wet lay-up with the same materials, steps, and tolerances. “Carbon fiber wrap” usually means fabric wrapped fully around a column for confinement, which ACI SPEC-440.12-22 §1.3 classes as contact-critical (load transfers by bearing). Fabric bonded to a beam or slab for flexure or shear is bond-critical, and only bond-critical work gets the pull-off acceptance test of §3.5.2 (> 200 psi, failure in the concrete).
FidStrong manufactures FSC carbon fiber fabric and the matching FSE primer, saturating, and leveling epoxies, under ISO 9001, 14001, and 45001 quality systems. Figures here are drawn from the product data sheets, ACI 440.2R, and ACI SPEC-440.12-22; installation must follow the project specification and a qualified engineer’s design.